


Free Shipping:Free standard shipping on orders over $129
Returns within 30 Days
Product Description
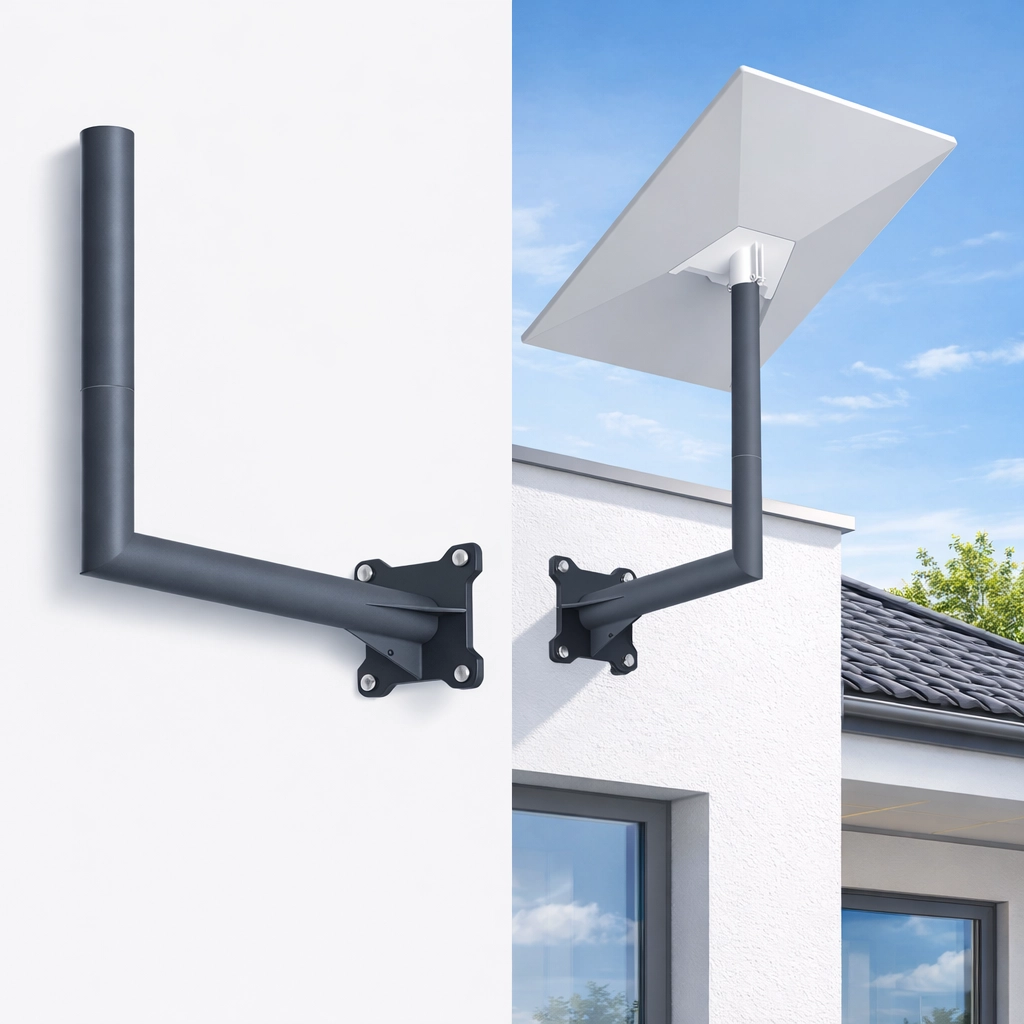
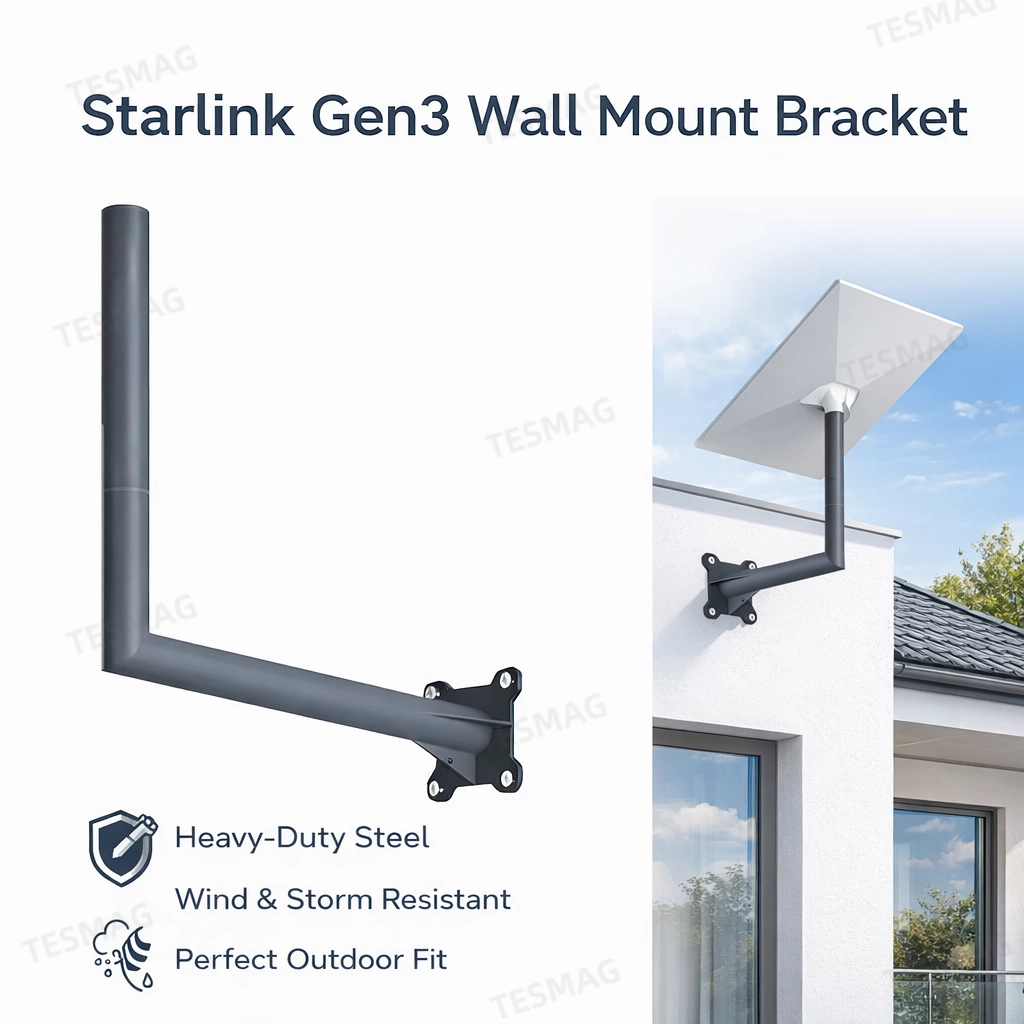
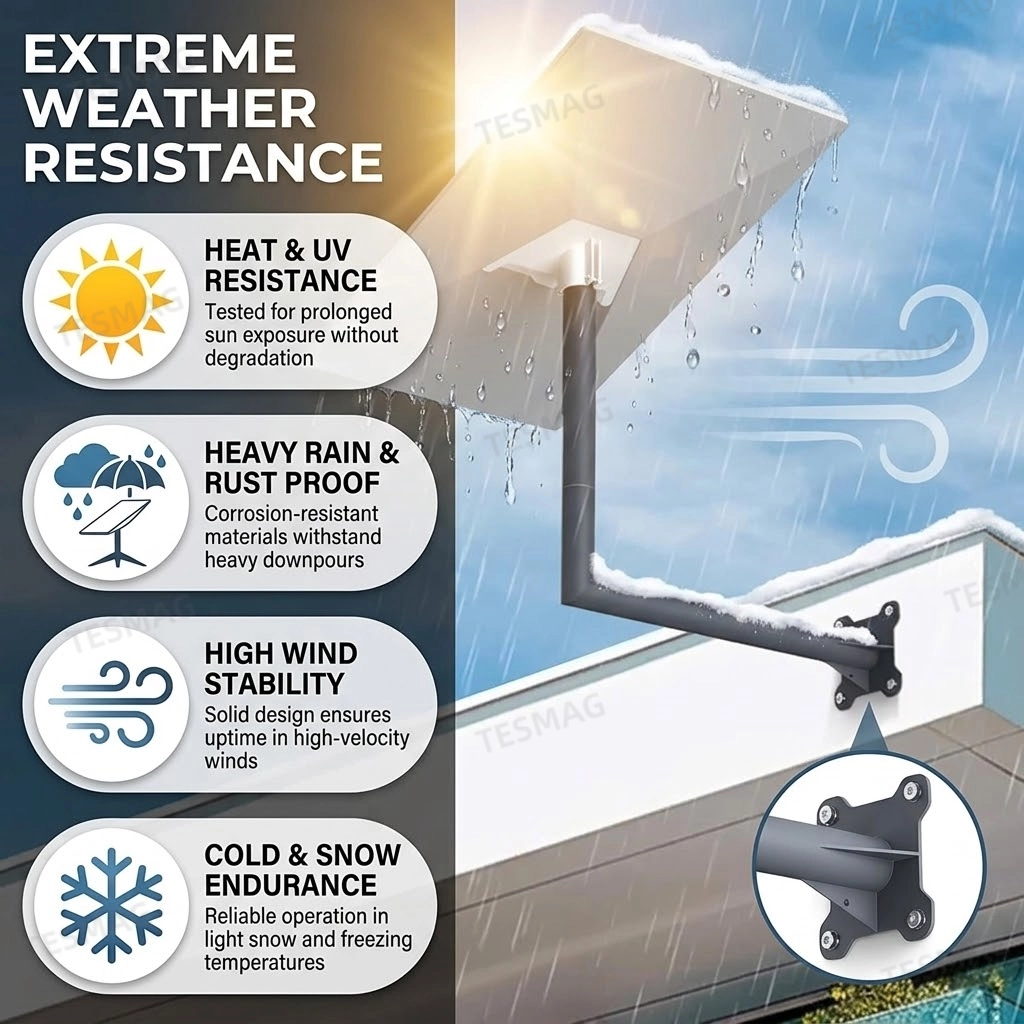
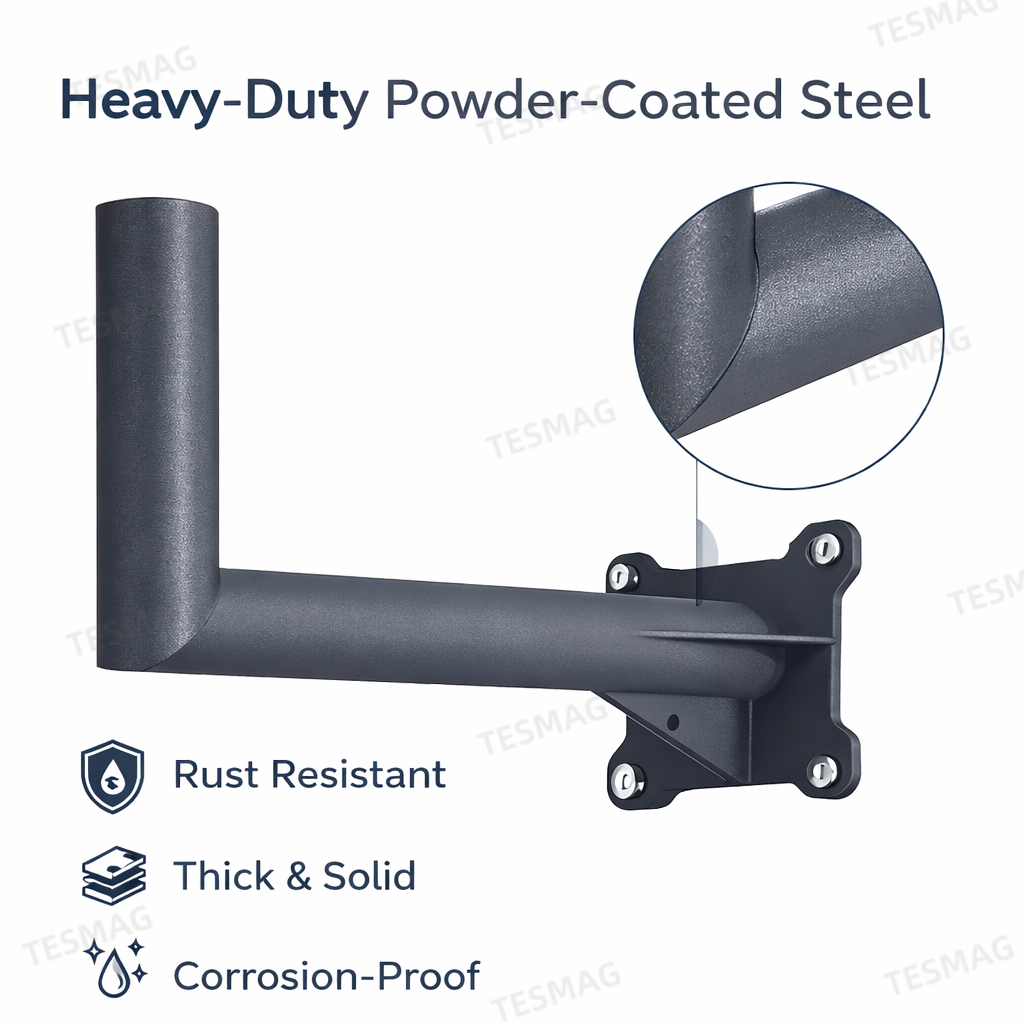
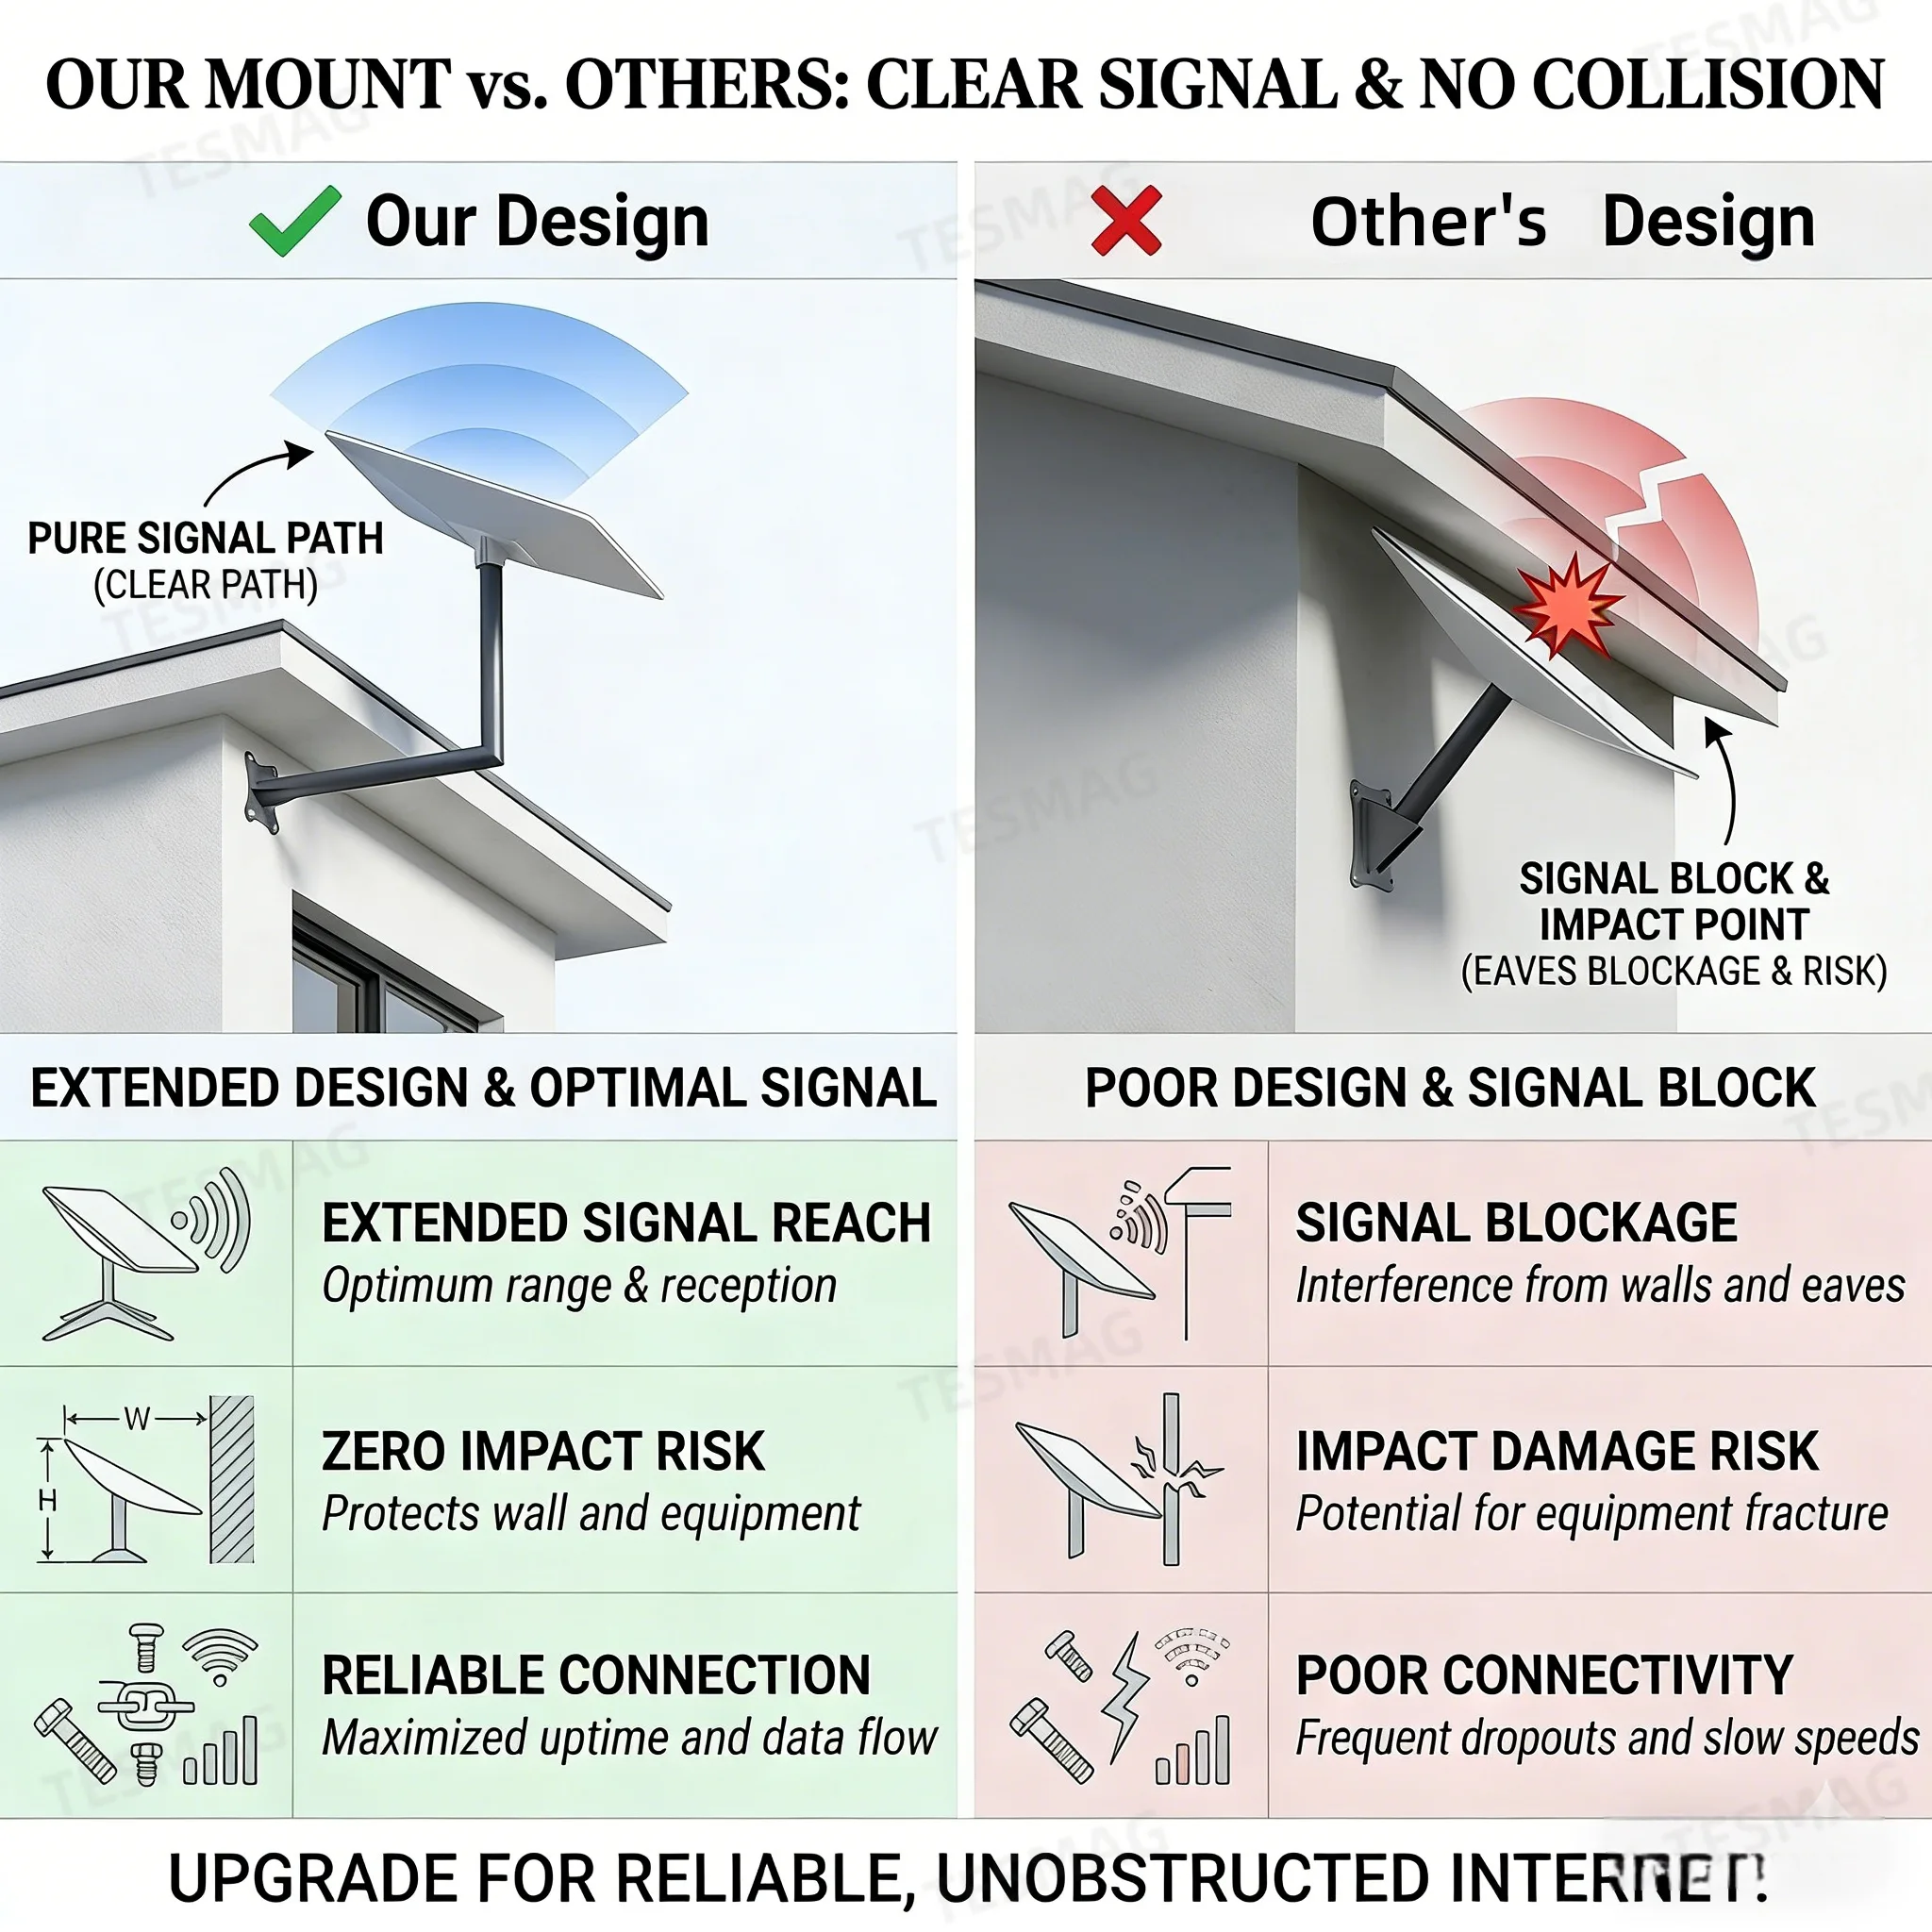
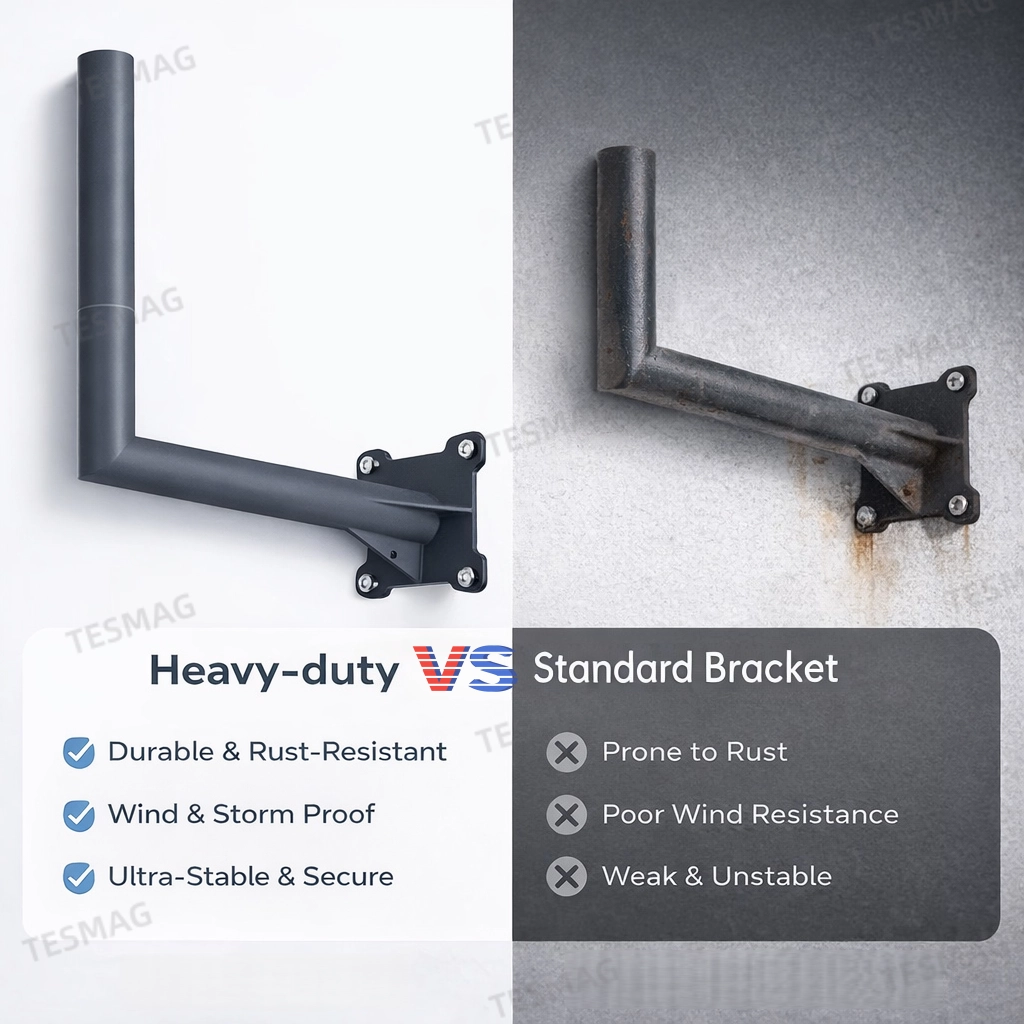
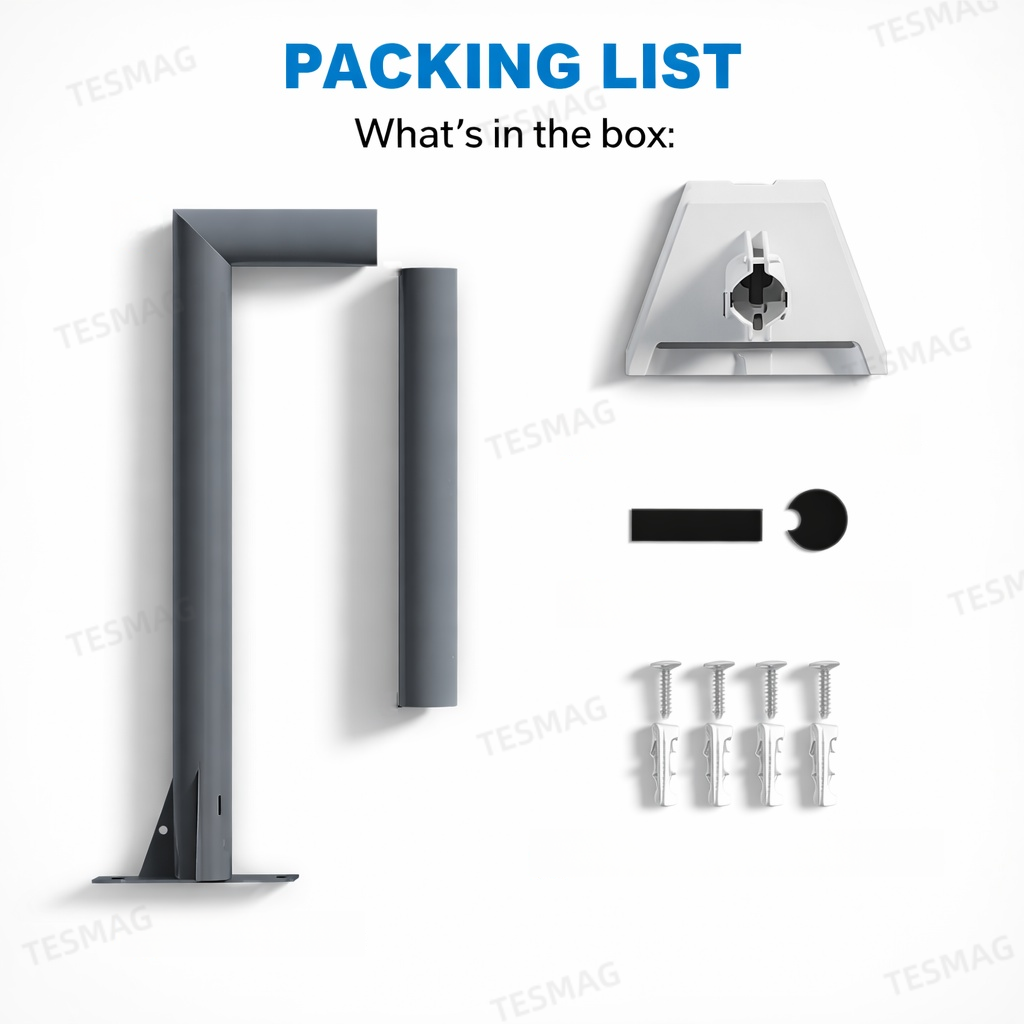
Install your Starlink Gen3 satellite safely on any home wall with this premium wall mount bracket. Made of durable steel with a heavy-duty L-shaped arm, it keeps your satellite dish stable even in strong winds and storms. The bracket includes all necessary hardware, expansion anchors, and a user-friendly installation guide. Space-saving design, adjustable arm height, and cable management make it perfect for homes, rooftops, or wall-mounted setups. Compatible with all Starlink Gen3 models, this mount ensures a secure and professional installation every time.

Bullet Points


Specification
| Feature | Specification |
|---|---|
| Material | Powder-coated steel |
| Compatibility | Starlink Gen3 Satellite Dish |
| Mount Type | Wall mount (vertical/flat wall) |
| Arm Design | L-shaped, extendable |
| Weather Resistance | Storm and wind-proof |
| Installation | Drill + expansion anchors |
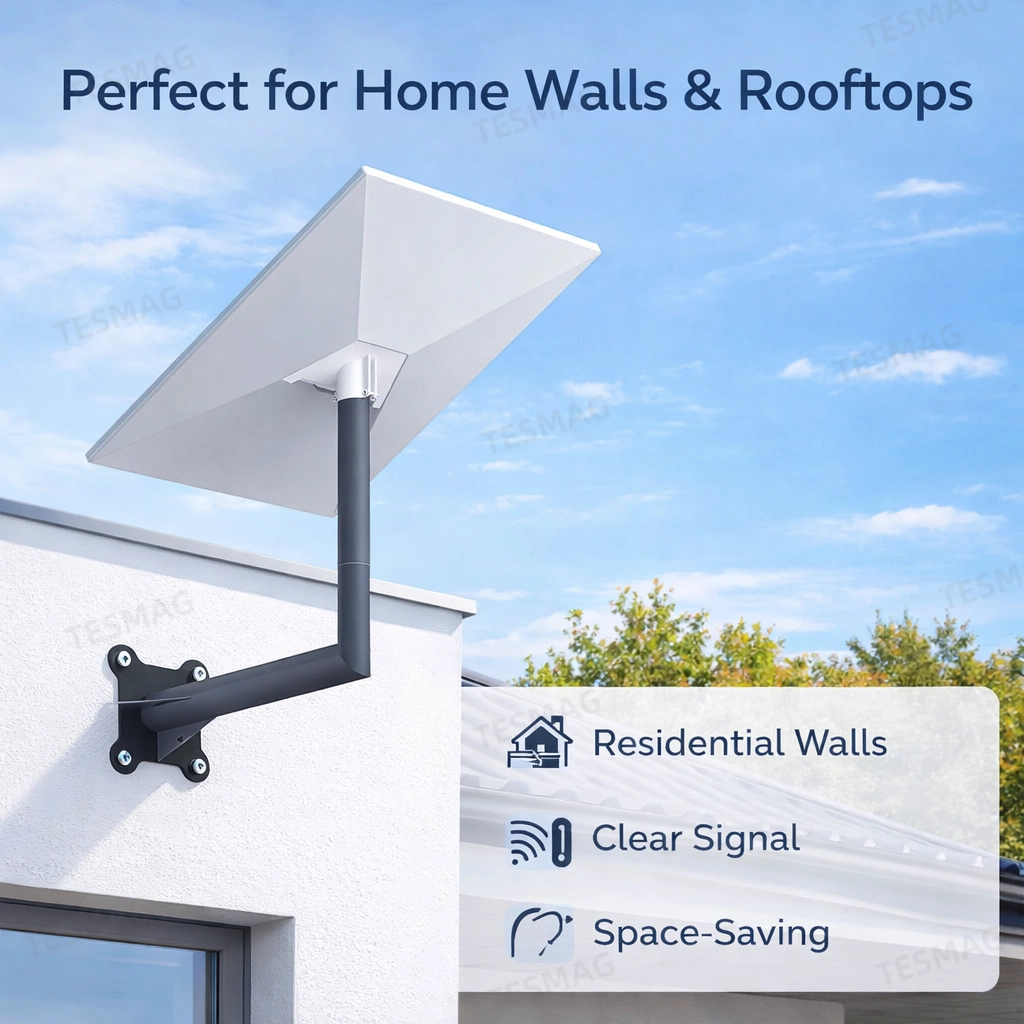
Applicable Scenarios

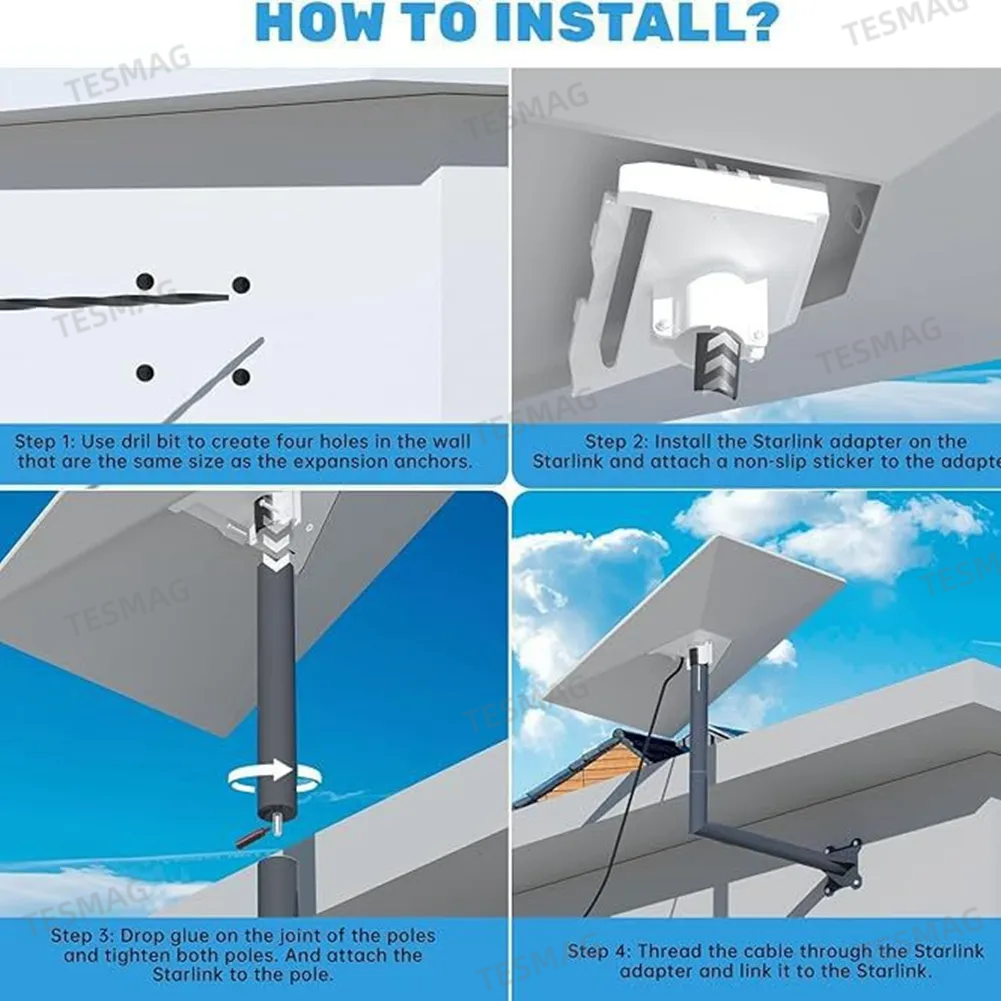
Installation
What's in the box
Why Choose Us
FAQ
Q1: Is this an aftermarket replacement or OEM product?
A: This is a high-quality aftermarket wall mount designed to fit Starlink Gen3, matching OEM standards.
Q2: Will this fit Starlink Gen2 or V2?
A: No, it is only compatible with Starlink Gen3 satellite dishes.
Q3: Can the arm be adjusted for height?
A: Yes, the L-shaped arm is extendable for custom height placement.
Q4: Does it require professional installation?
A: Not necessary, but recommended for high rooftops or difficult wall surfaces.
Q5: Can it withstand strong winds and storms?
A: Yes, steel construction plus expansion anchors make it storm-resistant and stable.
Shipping time depends on the product.
Free shipping on all orders $129+ worldwide!
For all orders under $129, the shipping fee is $5
| Product Type | Handling Time | Shipping time |
| Fast Shipping Products | 0-1 calendar days | 4-12 calendar days |
| Standard Products | 1-2 calendar days | 6-12 calendar days |
| Customized Products | 3-5 calendar days | 10-16 calendar days |
We will make every effort to deliver your package ASAP. However, additional time may be required due to invalid addresses and custom clearance issues. We have many cooperative express companies, such as DHL, FedEx, UPS, and USPS. We will choose the most suitable mode of transportation for you according to your country.
If the product is a customized product and in production, no refund or return without quality problems. After we receive your return, our quality assurance team will check your return. After the inspection is complete, our customer service representative will process your return refund or assist you in placing a replacement order for a replacement.
Damages and Issues:
If your product arrives damaged, or you receive the wrong product, please email us immediately at contact@teslaacessories.com with clear pictures of the damaged or incorrect product. We will review it in 1 business day and upon approval, we will dispatch a brand new replacement. Your 100% satisfaction is important to us.
Return Qualification Requirements:
1). Orders exceeding 1 month do not accept return or exchange of goods.
2). Orders only accept return or exchange of goods within 30 days.
3). No return or exchange on customized products(eg., Yoke Steering Wheel)
Refund instructions:
You will be responsible for paying the freight of the returned goods, as well as the possible customs duties and other expenses. Freight is nonrefundable. If you receive a refund, the return freight will be deducted from your refund.
For an item to be eligible for a return, it must remain in the condition it was received: unused, unworn, tagged, and in its original packaging.
Prior to initiating a return, please reach out to us at contact@teslaacessories.com. You can expect a response from us within 1 business day. Once your return is accepted, we will share detailed instructions for your return process. Please provide us with the tracking number and your order number once the return shipment has been arranged.
Upon receiving and verifying that the returned product adheres to our return conditions, we will commence your refund process within 1 business day using your original payment method. Be advised that all refunds may take up to 2 business days to process once we receive the returned item.Returns sent without prior approval will not be accepted.
Refunds & Order Cancellation
If the product is still being processed, you're eligible for order cancellation and a full refund. If your order was already fulfilled and you received a UPS, USPS OR DHL tracking number and you want to cancel, you MUST wait until the package arrives to start the return process.
Refunds for Orders Placed by Mistake:
Please be advised that if an order is placed due to an accidental click and is subsequently refunded, a 5% transaction fee will be deducted from the refund amount. This fee is charged by the payment processor, not by TESMAG. Therefore, the refunded amount will be less than the original payment.
To avoid any inconvenience or loss, we kindly ask you to double-check your order before completing the purchase. Mistakenly placed orders may incur this additional fee, so we encourage careful attention during checkout.
Return Fee
Customers are not required to pay for return shipping if a product is returned because it is "broken, missing, or wrong." If the product is returned due to "bought wrong, I don't want it anymore", the customer shall bear the return shipping cost, and the actual shipping cost will be deducted from the refund. In either case, there is no restocking fee for returns.
Non-Returnable Items:
Certain items, such as custom products (special orders or personalized items) and gift cards, cannot be returned. If you have concerns about your specific item, please contact us.
It is essential to ensure accuracy when filling out the return address. Please be aware that we cannot be held responsible for any returns that are lost or misdirected due to incorrect address information.
If due to our reasons, the goods received are damaged or not correct, the consumer is not required to bear the shipping fee for this reason.
Should you have any queries regarding returns and refunds, please don't hesitate to reach out to us at contact@teslaacessories.com.
Nalaganje